
There is always a first time for everything. This is one of those firsts. First time sewing for myself.
We all have a piece of garment we love. It fits great, looks great. I had a green cotton top with a diagonal neckline that looked great. Unfortunately it got worn to death! So I thought about cloning it!
I wish I had a better "before" picture to show you.

This is also the first time I drafted a pattern for myself from an existing piece. I will try to add some photos of how I went about doing this.
First I took the top apart at all the seams. There were only 4 basic elements - sleeves, front piece, back piece, small decorative tie. It looked really simple to put together.
Part A : Drafting the pattern
1. For the sleeves, I opened up one of the sleeves completely and traced it out on a tracing sheet.
Here are my drafted sleeves -


Most of the seam allowances were 1/2 inch already, so the drafting was easy.
2. Next the front and back pieces -

The front and back piece were essentially the same, except for the asymmetric neckline on the front piece.

So I made a single pattern piece using the back piece for both.

Also I made some adjustments to the seam allowances where needed. Like here I added another 1/4 inch to the seam allowance at the arm hole to get a 1/2 inch seam allowance. I feel that 1/2 inch seam allowance gives me more room to finish the seams well.

Since the front and back were same sized, I didn’t want to re-trace the pattern. So I decided to just have a asymmetric neckline cut-out. Something like a 1's complement (pardon my geekiness! I can't think of a more apt way to describe this!) piece that I can cut out to get the desired front piece.

Note that this piece is smaller by 1/4 inch to allow for the desired seam allowance at the neckline.
3. Decorative tie - There was no pattern piece required here.

Part B: Construction
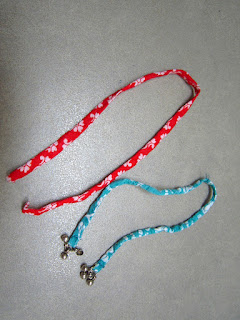
1. Decorative tie -
I just measured the length and cut out a strip to 14 inches long and 1 inch wide on the bias. Then went about folding it in half with right sides together and sewing a 1/2 inch seam along the length to create a tube. Next trimmed the seam allowance to 1/4 inch. Using a loop turner I turned it out the right side. Then added the tiny bells to the ends of the tie by hand.
2. Sleeve construction -
Cut out two of the sleeve pattern pieces from the fabric. Started off by finishing the hem on the sleeve. I folded the raw edge under by 1/4 inch and again by 1/4 inch to create a narrow hem. Attached a piping to the edge.


3. Attach the front and back pieces at the shoulder seam. I used french seams for this. Also I stay stitched the front and back necklines.

4. Next attach the sleeves to the arm holes of the top. There are many tutorials online to help with this. Since its a curved seam, take time to gently gather while attaching the sleeve. Also to finish the armscye seam, I flat-felled them. They turned out quite neat.

Nearly there!

5. Side seams - This top has side slits, so I used this and this tutorial to sew the side seams.
6. Neck facing - This tutorial was excellent to understand how to do a neck facing using bias tape. Originally I had planned to do this and then attach the piping to finish the garment. However I came across this article and realised I could save a little time and effort by using the piping itself for the facing!
7. Last step attach the decorative tie to the neckline by hand.
All done!

Enjoy!
We all have a piece of garment we love. It fits great, looks great. I had a green cotton top with a diagonal neckline that looked great. Unfortunately it got worn to death! So I thought about cloning it!
I wish I had a better "before" picture to show you.

This is also the first time I drafted a pattern for myself from an existing piece. I will try to add some photos of how I went about doing this.
First I took the top apart at all the seams. There were only 4 basic elements - sleeves, front piece, back piece, small decorative tie. It looked really simple to put together.
Part A : Drafting the pattern
1. For the sleeves, I opened up one of the sleeves completely and traced it out on a tracing sheet.
Here are my drafted sleeves -


Most of the seam allowances were 1/2 inch already, so the drafting was easy.
2. Next the front and back pieces -

The front and back piece were essentially the same, except for the asymmetric neckline on the front piece.

So I made a single pattern piece using the back piece for both.

Also I made some adjustments to the seam allowances where needed. Like here I added another 1/4 inch to the seam allowance at the arm hole to get a 1/2 inch seam allowance. I feel that 1/2 inch seam allowance gives me more room to finish the seams well.

Since the front and back were same sized, I didn’t want to re-trace the pattern. So I decided to just have a asymmetric neckline cut-out. Something like a 1's complement (pardon my geekiness! I can't think of a more apt way to describe this!) piece that I can cut out to get the desired front piece.

Note that this piece is smaller by 1/4 inch to allow for the desired seam allowance at the neckline.
3. Decorative tie - There was no pattern piece required here.

Part B: Construction
1. Decorative tie -
I just measured the length and cut out a strip to 14 inches long and 1 inch wide on the bias. Then went about folding it in half with right sides together and sewing a 1/2 inch seam along the length to create a tube. Next trimmed the seam allowance to 1/4 inch. Using a loop turner I turned it out the right side. Then added the tiny bells to the ends of the tie by hand.

2. Sleeve construction -
Cut out two of the sleeve pattern pieces from the fabric. Started off by finishing the hem on the sleeve. I folded the raw edge under by 1/4 inch and again by 1/4 inch to create a narrow hem. Attached a piping to the edge.


3. Attach the front and back pieces at the shoulder seam. I used french seams for this. Also I stay stitched the front and back necklines.

4. Next attach the sleeves to the arm holes of the top. There are many tutorials online to help with this. Since its a curved seam, take time to gently gather while attaching the sleeve. Also to finish the armscye seam, I flat-felled them. They turned out quite neat.

Nearly there!

5. Side seams - This top has side slits, so I used this and this tutorial to sew the side seams.
6. Neck facing - This tutorial was excellent to understand how to do a neck facing using bias tape. Originally I had planned to do this and then attach the piping to finish the garment. However I came across this article and realised I could save a little time and effort by using the piping itself for the facing!
7. Last step attach the decorative tie to the neckline by hand.
All done!

Enjoy!
