Sunday, February 16, 2014

Frozen Goodies

I kept scratching my head to figure out what do for Valentine's Day this year. Finally decided to make some frozen goodies.

Low Fat Strawberry Frozen Yogurt


 Ingredients:-
2 cups low fat curd
10 odd strawberries
1/2 cup sugar
 Pinch of salt

Procedure:-
Blend the strawberries and curd in a mixer along with the sugar and a pinch of salt. Pour it out to a freezer safe container. Every 30 mins for the first 3 hours, take out the frozen yogurt and whisk very well to break any ice crystals. Freeze for total of about 5-6 hours.

Creamy Dark Chocolate Ice cream


 Ingredients:-
250 ml low fat milk
1 cup of cream
1/2 + 1/3 cup of milk powder dissolved in 1/2 cup of hot water
2/3 cup of sugar
2 tablespoon honey
2 teaspoon cornstarch
1/3 cup of dark cocoa powder
150gm of dark chocolate
1 tspn of vanilla extract
1 tspn of rum
pinch of salt

Procedure:-
Boil milk, cream,dissolved milk powder, sugar and honey in a heavy bottomed pot. Make a slurry of cornstarch with a little milk and keep aside. Add the cocoa powder into boiling milk and whisk well. Add the slurry of cornstarch and whisk while the mixture thickens. Take the pot off the heat and add chopped chocolate, vanilla extract, salt and rum. Combine well. Let it cool.
Freeze this custard. Every 1 hour for the first 3 hours take it out and whisk well to break any ice crystals. Freeze for a total of 5-6 hours.

And the winner is -


 Enjoy!

Tuesday, February 4, 2014

Sleep Sack

I have been a light sleeper but there is such a thing as "mother's sleep". Since the past one year I have been sleeping as if I were in a railway bogie. There was a time when Adrika was a few weeks old when I used to get up randomly in the middle of the night to check if she's breathing! Developing a mother's anxiety is innate and ingrained into our DNA.
Well I no longer get up to check if she's breathing. And yes, I do not think I require psychiatric evaluation! The irony is my babe has been sleeping through the night since she was 8 weeks old. But I still do get up once in a while to check if she's kicked off her blanket. Hehehe, I am crazy I know.
There is a untold law of humankind - The colder the night , the more often your baby will kick off her blanket.
So I sewed up this sleep sack to ensure that she sleeps snug. 


She likes it. She even likes to touch her toes in it!


The cloth is flannel. It has a 16 inch side zipper and velcro straps up front.

Things I learnt during this project -
  • How to make a pattern from existing clothes. I couldn't find any pattern online for a sleep sack with side zipper. I didn't like the ones with the zipper down the front. So I decided to make my own pattern. Turned out great.
  • How to sew a centered zipper. It was fun to use my zipper foot and get this done. 
  • How to do french seams. They give a real neat finish. The inside of my sleep sack looks as pretty as the outside. No raw edges anywhere. 
  • How to properly make bias binding. I have made binding for the quilting project earlier, but I learnt it properly this time, including a nifty little tool I made to iron out the binding. Will share details in a later post on binding. 
  • How to sew a binding around curves.
Here is wishing me a good night sleep!

Friday, January 31, 2014

Strawberry Jam

It's strawberry season yeah! It's one of those things I love about living in Belgaum. We are fairly close to Mahabaleshwar and get loads of fairly inexpensive strawberries! So this year we got about a kilogram to be precise.


They were the tart variety and pretty good for jamming.

Ingredients:-
Strawberry - 1 Kg
Lemon - 1
Sugar - 2 cups

Procedure:-
Wash and cut the strawberries into chunks (we like chunks in the jam).  Put them into a heavy bottom pan. Add sugar and lemon rind and juice. Also keep the lemon and pips in a muslin cloth for added pectin. Bring to a boil over medium heat. Let it simmer for about 30 to 40 mins. Perform the jam test to check if its done.


Got two large bottles out of it. Ensure to sterilize the jars for jamming. For this, wash the jars with soapy water and leave them in an oven for 10 mins at 100C.

Monday, January 20, 2014

Wet Bag

We cloth diaper Adrika. Feels good. She likes it better than disposable diapers and we feel good about doing our bit for the planet. We use Flip from Bum Genius - http://www.flipdiapers.com/products.php
Pardon the slightly archaic picture of my pumpkin. Its kind of cool here and she wears pants all the time, so haven't clicked any recent ones in her cloth diaper!


Unlike disposables it would be a very expensive affair if one tosses the dirty cloth diapers. One could, but you know what I mean. Hence the whole issue of storage of a soiled diaper. This is where a wet bag comes in handy. A wet bag is a cloth bag with a water proof inner lining (generally made of PUL or shower curtain material). The beauty is one can toss even the bag into the washing machine.

Here is the wet bag I made for 'Mon Cherie'. There is a good possibility that she would be cloth diapered as well. Hope this bag holds through.


The tutorial was straightforward - http://www.youtube.com/watch?v=NG8WN7mYr8E
I added a handle to make it easy to hang the bag on a door knob or just to carry it. I think it has many applications, can also store other nick-knacks.

Sunday, January 19, 2014

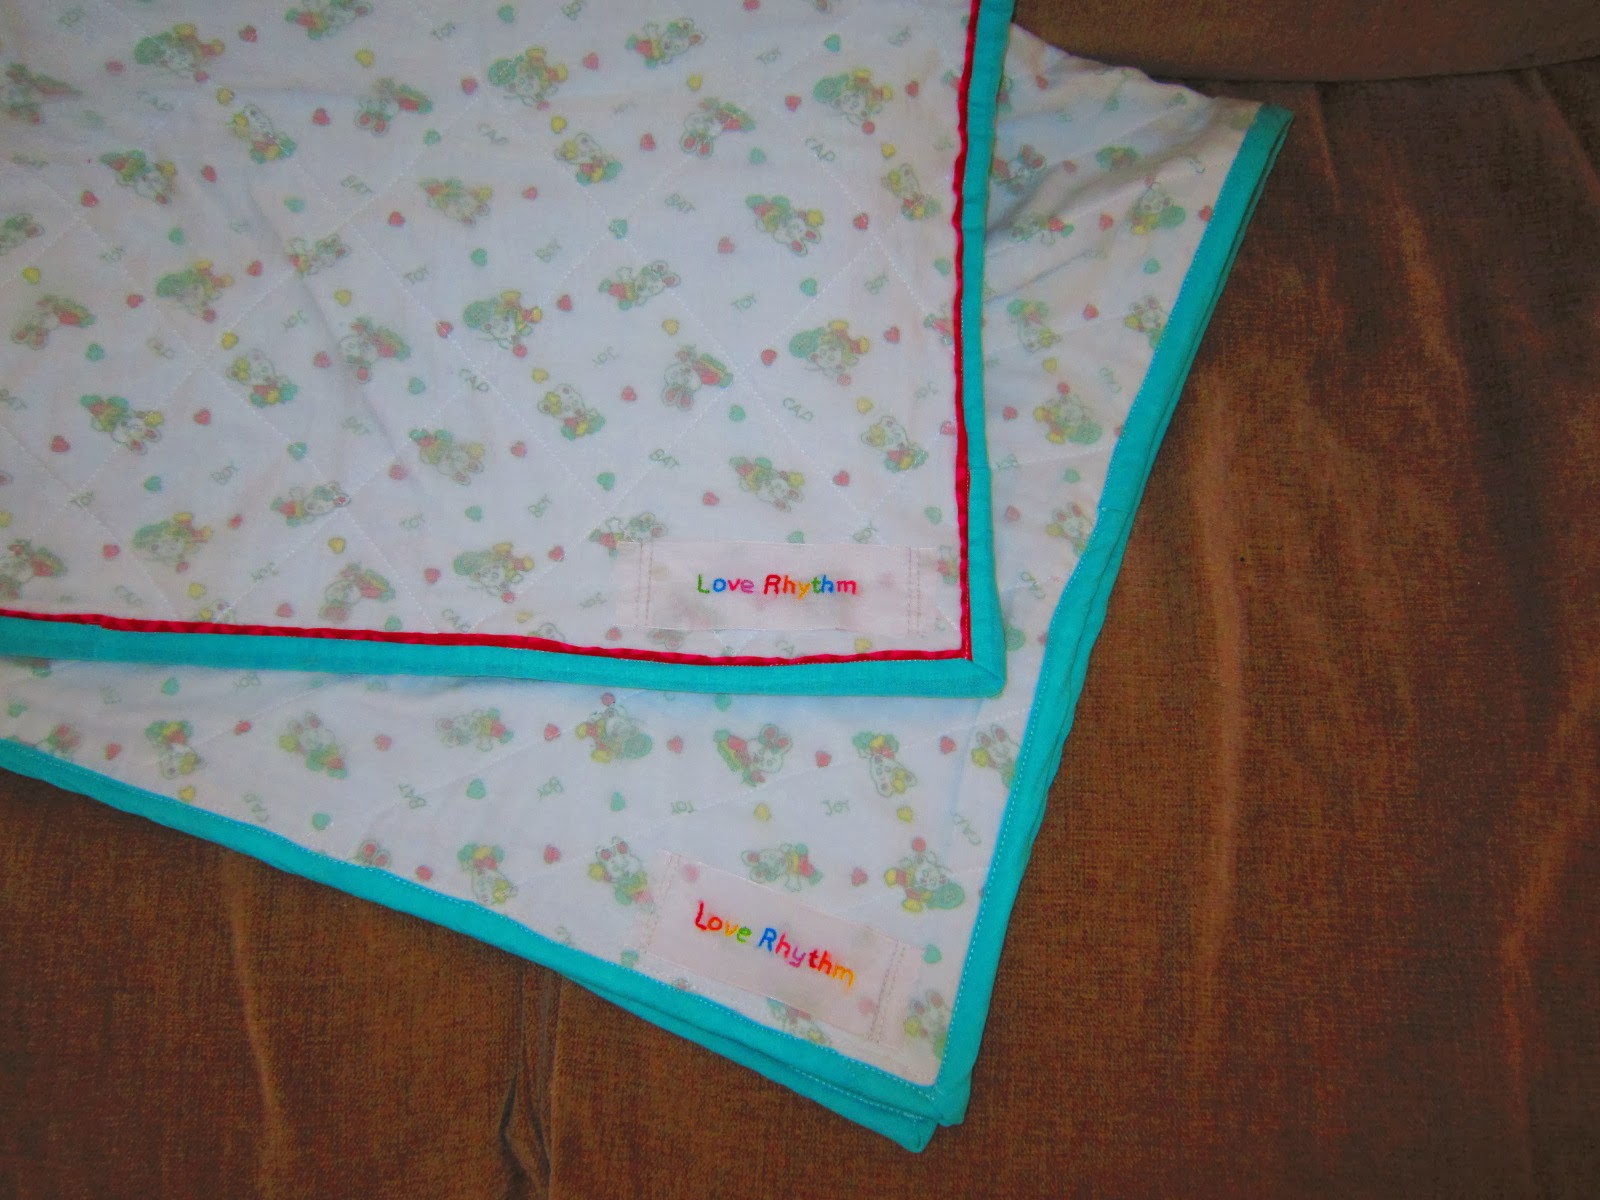
Baby Quilts

Being a mother of a one year old, I have received quite a few baby gifts. I can pile them up into a petite little mountain! Some of the gifts I will cherish and keep forever, like the few handmade one's from my mother and my mother-in-law.  I love handmade goodies. Also I absolutely cherish putting in some thought and effort into any gifts that we have to get. There are two lovely little girls who have been on my mind lately. These quilts are for them of course!

Little doll Diya has already got her's and I hope she is enjoying her new quilt! 


These were my very first quilts and believe me it took effort! A lot of hard work and patience. I used double layered flannel as the batting and muslin for the upper and bottom layers.
If ever there is anything more evil in this world than bias binding; I would be greatly surprised. Jokes apart, I got a little smarter on the second one and used a flange instead of binding. The one with the flange has the little pink highlight, looks neat right! Flange was super easy as compared to the traditional bias binding. Oh yes, I was stupid enough to make the entire binding from scratch.

Used a couple of resources -
Also another big big surprise was the amount of Math one needs to do for sewing! Phew! Was totally sucked into square roots and the lot!

Loved sewing these. I put in so much back breaking work - mitered the corners, even hand embroidered the labels!


The second one is for my yet to be born niece - 'Pour Mon Cherie. Stay cozy. Love Rhythm.'


Tuesday, December 24, 2013

Kinnow Marmalade

I abhor kinnow! Its difficult to eat and doesn't taste like an orange. When I asked Ajay to get oranges, guess what he thought was an orange! Apparently its a type of Mandarin orange. The best thing I found out to do with kinnow is to make marmalade. Jamming transforms this fruit. This marmalade is made with natural pectin and sets beautifully. Also it has a slight bitter component due to the rinds, that makes it delicious.


Ingredients:-
Kinnow - 4
Lemon - 1
Sugar - 3/4 cup
Water -1 cup

Procedure:-
Wash and peel the kinnows. Keep peels of two kinnows, cut them into thin strips. Slice the kinnow right in the half like slicing into two hemispheres! This makes it easy to remove the seeds which are generally in the center. Also remove and keep as much of the white pips as possible. Put the sliced fruit into a heavy bottomed pan. Add the juice of a lemon and strips of kinnnow peel.
In a muslin cloth or handkerchief put all the seeds and pips, including the seeds of the lemon and also the squeezed out lemon itself.  Tie this into a nice bundle and throw it into the pan. All the natural pectin is released from this bundle.
Add the sugar into the pan along with the water. Boil on slow flame for about 1.5 to 2 hours. At 1.5 hour stage check for the consistency. To do this, keep a small plate in the freezer. Add a drop of the marmalade onto this chilled plate and check if it sets into a jelly. If it does, then the jam is made otherwise cook for a further 15 mins and repeat setting test.
We got 1.5 small jars of marmalade.

Monday, December 2, 2013

Pecan Pie

Please excuse my torpidity lately! I have been meaning to put up many posts. Have been fairly busy baking. Here is something I tried by pure coincidence on Thanksgiving day!


It all begins with the story of how I got hold of pecans. Well these nuts are non existent in India. Ajay's aunt was visiting us from London and she is known to come bearing many gifts! Thank you auntie! We are enjoying your presents. Pecans down, only if I could figure how to finish off the truck load of spanish saffron now!

Ingredients:-

For Filling
Brown sugar - 1 cup
Normal sugar - 1/4 cup
Whole wheat flour - 1 tbspn
Eggs - 2
Vanilla extract - 2 tspn
Milk - 3 tbspn
Melted butter - 1/4 cup
Salt - 1/4 tspn
Chopped Pecans - 1 cup
Rum - 1 tbspn

For Pie Crust
Whole wheat flour - 1.5 cups
Sugar - 1/2 tbspn
Salt - 1/8 tspn
Oil - 7 tbspn
Liquid (Milk or Water or Juice) - 1/4 cup

Procedure:-

For pie crust - Mix in a bowl all the ingredients till moist clumps form. Add the liquid slowly into the dry ingredients. There is no need to refrigerate this pastry. With your hands press down the dough on the pie mold evenly on the bottom and up the sides. Score with a fork. Pie crust is ready for filling.

Filling - In a mixing bowl add both the sugars, flour, salt and two eggs.  Beat very well till all the sugar is dissolved. If the sugar is not dissolved it would sink to the bottom of the pie during baking. So ensure it is nicely mixed. Add the remaining ingredients and mix well.

Pour this filling into the pie shell and sprinkle with pecans on top. Bake in a preheated oven at 180C for 40 - 45 mins. Cool completely before cutting the pie.

For a variation, one can add a bit of chocolate to the filling.